Toys Go Out

Toys Go Out - a fun read-aloud book

I love reading books to my children, and this one is a new favorite of mine.
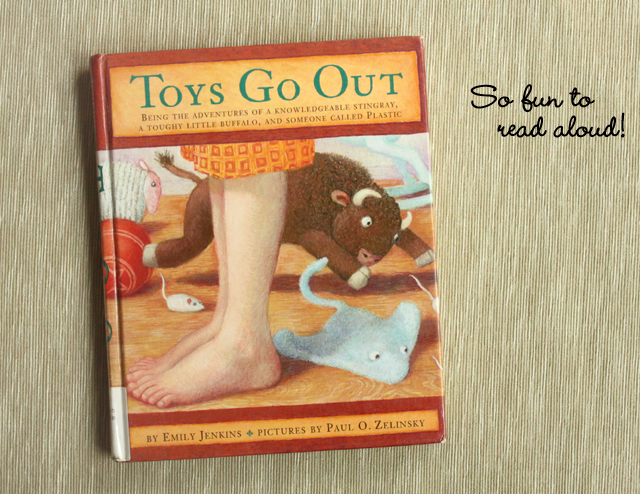
Toys Go Out” by Emily Jenkins is a delightful story about the adventures of a little girl’s toys — from the perspective of the toys. I discovered it recently when an acquaintance posted about the series on Facebook. I started reading it to my kids yesterday, and this afternoon we finished it. As I read, I actually laughed out loud a few times at what I was about to read, which made my kids very eager to hear what came next!

When we first meet the toys, they’re in a backpack that smells like a wet bathing suit, trying to figure out where they’re being taken. Their observations (and misunderstandings!) of the world they live in are amusing, and each of the toys have feelings and attitudes that children can identify with. Their conversation is clever and honest and just perfect for reading aloud.

Toys Go Out - a fun read-aloud book

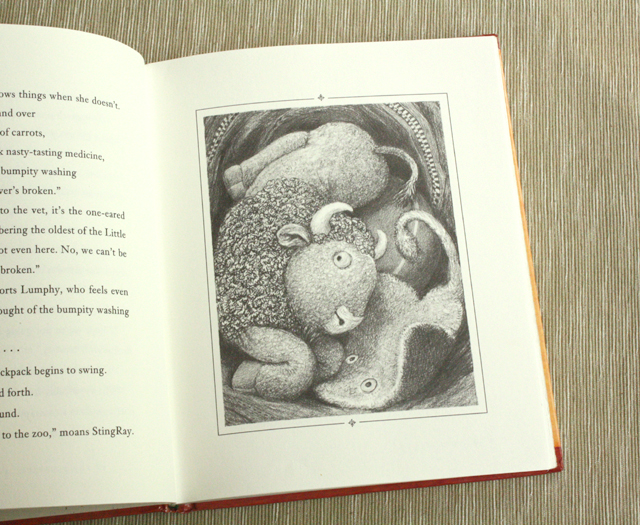
Each of the six chapters has just one charming illustration by Paul Zelinsky. There are two other books in the series (“Toy Dance Party” and “Toys Come Home“), and today our children’s librarian happily ordered them at our request, since she doesn’t like having partial series of books. Aren’t libraries the best?!

My two oldest kids are in elementary school, and both of them enjoyed listening to “Toys Go Out.” What are your favorite read-aloud books? I’d love to hear your recommendations.

a month of daily walks

Last month, I made a resolution to go for a walk every day in May. It was such a good decision! I loved it even more than I thought I would, mostly because I decided to walk in a different place every day. I wasn’t sure I would be able to find 31 places to walk, but somehow I did. It was a great excuse to explore trails, parks, and neighborhoods I had never been to. I discovered lots of places that I’m looking forward to enjoying again.

On each of my walks, I took a picture with my iPhone and posted it to Instagram with the hashtag #dailywalk. Looking for something to photograph each day focused my attention on the beautiful world God has created, and I saw things I may not have noticed otherwise. If you follow me on Instagram, you have already seen these photos, but if the rest of you want to see the full-size images, you can find them all here.

a month of daily walks

It’s so hard to choose my favorites, but the photos from May 5, 8, 17, and 23 are some of the ones I love. (Days 2 and 30 are my least favorites.)

A few interesting facts:

  • Ethan rode along (or was carried) for all but three of these.
  • My phone jumped out of the stroller onto the sidewalk on May 7. It still works just fine, but the back is very cracked. So sad!
  • On May 24, I walked eight laps in our driveway because it was raining.
  • I saw a couple buffalo on May 29.
  • One photo was taken in Maryland.
  • No photos were taken at IKEA, although I was prepared to count a shopping trip as a walk on a rainy day if I needed to.

In 2013, the one little word I’m focusing on is best. The decision to go for daily walks in May was one of the best things I’ve done all year!

crib skirt for an IKEA Sundvik crib

crib skirt for IKEA Sundvik crib

Little by little, Ethan’s bedroom is coming together… at least in my head! Progress is slow because I’m a DIYer to the core and want to make everything myself — bedding, curtains, art, and even furniture upholstery. Are you the same way?

Ethan sleeps in an IKEA Sundvik crib, which has solid panels on the ends, rather than slats. I wanted the crib skirt to come down just to the bottom of the frame, and since one side of the crib faces the wall, I could get away with using just a single rectangle of fabric for the skirt. So it’s more like a crib “apron” than a crib skirt, and since I didn’t want any ruffles or pleats, this was the easiest sewing project ever.

crib skirt for IKEA Sundvik crib

MATERIALS:

1/2 yd. fabric (54″ wide) OR 1 1/2 yd. (42″ wide)
packing tape

INSTRUCTIONS:

1. Hem the fabric on all four sides so that it measures 52.5 x 16.5 inches.

2. Tape it to the crib with clear packing tape. Nobody will know!

crib skirt for IKEA Sundvik crib

I wanted fabric that would just blend into the background and not compete with other fabrics in the room, so I chose white broadcloth, which is nice and heavy and not too see-through. Many fabrics are just 42 inches wide, but I lucked out with 54-inch-wide fabric, and thanks to a coupon, I spent just $2.40 on this simple crib skirt.

crib skirt for IKEA Sundvik crib

My next project will be reupholstering the chair that sits in the corner of the room next to the window. I already have the fabric — I just need to find the courage!

daily walks in May

daily walk - May 1, 2013

Isn’t spring the most glorious season?!

Cool mornings lead to warm afternoons. Flowers and trees burst with new growth. Birds build nests in the craziest places. Grass turns from brown to green. The smell of someone else’s grilled dinner wafts through the neighborhood. A lovely breeze blows through our open windows. Sunshine lifts my spirits. In the spring, I feel renewed, alive, free.

Now that I’m a “stay-at-home” mom, I have the flexibility to get outside and enjoy this beautiful weather every day — and that’s what I plan to do! I’m resolving to go for a walk every day during the month of May, and I’ll post a picture from each day’s walk on Instagram with the hashtag #dailywalk.

Ethan fell asleep during our walk this morning, and when he woke up, we were at the library. He has a pretty good life.

Are you doing anything special to celebrate and enjoy spring? Or have you set a new goal for yourself this month? If so, tell me what you’re up to. I’d love to cheer you on!

DIY baby gym

handmade baby gym

A few weeks ago, I noticed that Ethan was starting to focus more intently on objects that were dangled in front of him. He loves to lie down on the floor and kick his chubby legs, and he was ready for a more interactive environment.

So I made a baby gym.

Obviously, it would have been easier to just buy one, but it was much more fun to create my own. I had complete control over the design and color scheme AND it was cheaper than buying one — even with the purchase of snap pliers. I scoured the internet for inspiration and then loosely followed this tutorial.

The baby gym I made is basically a very simple 35×35″ pieced quilt with tabs sewn onto the corners for covered hula hoops to snap onto. This makes it easy to remove the arches to wash, store, or transport the mat. And when we’re finished using it as a baby gym, I can just rip out the stitches that attach the tabs to the mat, and it will just be a simple little quilt again.

handmade baby gym tab with snap

I did invest in a set of KAM snap pliers for this project, and this was my first time working with plastic snaps. Setting the snaps was SO easy, and it made me want to create lots of items that require snaps. If you live locally and you ever want to borrow my snap pliers, I’d be glad to let you use them.

Each arch on the baby gym has five ribbon loops for hanging toys, and I bought a pack of 24 plastic links for just a few bucks. To hold the two arches together at the top, I sewed a long strip of fabric with half of a snap set on each end. Then I just twisted it around like I was tying ribbon onto a gift upside down: center the fabric strip underneath the two arches, bring the ends up to the top and criss-cross them, then pull the ends down to the bottom and snap them together underneath.

handmade baby gym arch connector

Ethan is three and a half months old, and spends lots of time wiggling, rolling around, and kicking and batting at toys in the baby gym. Happy baby, happy mama!

handmade baby gym

SOURCES:

yellow, green, and polka dot fabrics: JoAnn Fabric and Craft Stores
blue fabric: Walmart
hula hoops: Dollar Store
snap pliers and snaps: KAM Snaps via Amazon
plastic links: Amazon (also available at Walmart)
butterfly and turtle toys: received as gifts
cute baby: not available for purchase

masking tape maze

masking tape maze

With snow in the forecast for Sunday night, my kids were hoping for a snow day on Monday… and I was already making a mental list of a few special activities they could enjoy on their day off. But the snow didn’t start falling until we were eating breakfast on Monday, and so they headed off to a full day of school as usual.

One of my ideas was this masking tape maze that I made for them that evening after dinner. Since our carpet is light in color, I actually used blue painters tape to create a maze on the floor of our living room. I started with the rectangular outline and then just kept making lines inside until I had a complete maze. It wasn’t a very complicated maze, and it didn’t have any dead ends or decision points, so it only took me a few minutes to lay it out.

masking tape maze

Younger children might enjoy kicking a ball through the maze or using it for trucks and cars, but my two older kids are in elementary school, so I told them that their goal was to move a ping-pong ball through the maze by blowing it with a straw. Of course, the ball rolled out of bounds many, many times, but they weren’t aiming for perfection, so they just put the ball back in and kept going.

I thought Hayden might want to use a stopwatch each time he did the maze to see if he could improve his time, but after he maneuvered the ball through the maze once, he didn’t want to do the same thing again. So he adjusted some of the tape to make different pathways of varying widths and angles, as well as some dead ends, and later added other little toys as obstacles.

And then before bedtime, we pulled up all the tape and threw it away. If we want to do it again, we can make a brand new maze another day!

What ideas do you have for using a masking tape maze? Perhaps younger children could hop through the maze on one foot, or older children could drive a remote control car through the maze. I’d love to hear your ideas.

Project Life 2013: the title page

Project Life title page by Rachel Swartley

Life is full of moments I want to remember.

So I take pictures of some of those moments, I eventually download them to my computer, and then I ignore them. Unless I post my pictures on Facebook or Instagram, my friends and family can’t enjoy them, and unless I print them, my kids can’t see them. I’m not a scrapbooker, and filling a traditional photo album with a bunch of prints seems boring and old-fashioned, so most of my pictures are stuck in my computer.

When I was a kid, I enjoyed looking through our box of photos that my parents and grandparents had taken, but since all of my photography is digital, my family doesn’t have easy access to the pictures I take. Last year it started to bother me that my husband and kids couldn’t see most of the photos I took of our family activities, so I framed a few more photos, I printed a Blurb book full of pictures from our week of vacation in Chincoteague, and I discovered Project Life.

Project Life is described as a “back-to-basics approach to memory-keeping” that “takes the scrapbooking out of scrapbooking.” The album is a 12×12-inch binder that uses plastic sleeves (similar to baseball card collections), and to me it feels like a hybrid between a regular photo album and a traditional scrapbook. The photo at the top of this post is my Project Life title page for 2013.

I bought an album and plastic sleeves, but opted not to buy the core kit, even though it’s considered to be an essential component. I want my album to reflect my own personal aesthetic, so I’m planning to create and design everything myself. There are various styles of page protectors that have different layouts, but I’m just using Design A. The large pockets are 4×6″ and the small ones are 3×4″.

A lot of people who do Project Life create a two-page spread for each week, but I want to fill up my album at whatever pace seems right to me. At this point, I’m planning to divide my album into monthly sections, and some months will probably have more pages than others. My album, my rules.

Here are a few close-up shots of my title page:

Project Life: hello twenty-thirteen - with stitching

These little flags are made of washi tape.

Project Life: washi tape flags

I love the textured papers — it gives the simple design a bit more depth.

Project Life: 2013 title page - textured papers

So that’s the beginning of a project that I’m looking forward to working on throughout the year.

Are you familiar with Project Life? Is this the first time you’ve heard of it, or are you already an avid Project Lifer? If you have experience with Project Life and have any advice to share, please leave a comment. I’d love to hear from you!

my littlest Valentine

heart-shaped glasses made from pipe cleaners

Happy Valentine’s Day!

Inspiration for the heart-shaped pipe cleaner glasses found here. I put a tiny dab of hot glue on each of the sharp ends of the pipe cleaners for safety.

mini heart bunting card

paper heart bunting card

Last weekend I assembled an IKEA Expedit shelving unit for storing all of my craft supplies. It was originally intended for Ethan’s room, but the construction of his room took so long that I found a different use for it meanwhile! We’re just waiting for the carpet to be installed now, so I guess I’ll need to make another trip to IKEA soon. Poor me…

While I was gathering all of my craft items into one place, I came across some scraps of paper left over from the paper flag bunting and the mini bunting cards I made last summer. So I used some of those colorful little scraps to create a very similar bunting card, but this time I made the bunting with tiny hearts instead of triangle flags.

I punched out two hearts of each color and glued them together with a string between the layers. If you make a card like this, I recommend gluing the hearts to your string before you tie it to the card. I tied the string to the card first and I almost ran out of room! And actually, if you glue the string on the hearts before tying it to the card, then you can just use one heart of each color, which would be easier.

I only made one of these little cards, and don’t plan to make another. But hopefully one of you will benefit from my hindsight!

white paper heart garland

white paper heart garland

Paper is my favorite material to create with, and white is my favorite color (even though it’s technically not a color!), so of course I had to make some Valentine’s decor with white paper. This simple paper heart garland was made from four sheets of white cardstock and some white thread. I punched out the hearts using the same punch I used for the framed paper heart art I shared with you the other day. Then I stitched up five strands of 35 hearts each with my sewing machine and tied them to a tension rod.

If it looks like the room behind those hearts is empty, you’re right! Once the carpet is installed in our brand new room, then we can put furniture and little Ethan in it. Can’t wait!

chocolate dipped pretzels for Valentine’s Day

white chocolate dipped pretzels

I love tiny things. Make something smaller than usual, and it’s instantly more interesting. I think that’s part of the reason I’ve been making so many chocolate-dipped pretzels recently. Mini pretzels + mini heart sprinkles + chocolate = adorable little Valentine’s treats.

mini heart sprinkles

I found these itsy bitsy heart sprinkles in a bulk package at my local grocery store, but Wilton also sells them as “micro heart sprinkles.”

Just melt your chocolate in a double boiler (I used semi-sweet chocolate chips and white candy melts), then dip your pretzels in the chocolate. Sprinkle with the tiny hearts and place on waxed paper to harden. These would make a pretty little gift for a friend, neighbor, your child’s teacher, or anyone else you love or appreciate! Most of mine disappeared during the Super Bowl party we hosted on Sunday evening, so I’ll need to make more soon.

chocolate dipped pretzels

P.S. Is it just me, or do you think the pretzels with milk chocolate look like little masked bandits?! Or maybe like they’re ready to attend a Valentine’s masquerade ball!

paper heart art

paper heart art

Can you believe that Valentine’s Day is next week? I feel like we just celebrated Christmas, and now another holiday is just around the corner!

A few years ago I discovered the folded paper heart art made by Sarah and Bendrix, and I’ve been wanting to make something similar ever since. Their white-on-white art is very sophisticated, but I thought my kids would enjoy something with more contrast. So last week I punched out a bunch of white paper hearts (and one red one!), glued them to an 8×10 sheet of black paper, and stuck the completed project in an IKEA Ribba frame.

Our baby boy was born a few weeks before Christmas, so I didn’t do any Christmas crafting in December. Now that the pain of my pregnancy-induced carpal tunnel has mostly gone away, it feels good to start creating things again!

a little tote bag for a little man

Back in December, just ten days after he became a big brother, Hayden suddenly decided one Sunday morning that the tote bag he always took to church was too childish. He was pretty insistent that he could just carry his Bible, activity books, and writing tools in his arms, but I somehow convinced him to keep using the old tote bag with the promise of a new one soon.

He didn’t know this, but when the mother of a newborn uses the word “soon,” she might mean “in six weeks.

Last week I bought four feet of royal blue nylon webbing at JoAnn Fabric to match some canvas-like fabric I already had on hand. And on Saturday night while the kids were getting their baths, I sewed up a little blue tote bag.

canvas tote bag

Hayden told us that the Phillies wallet and Angry Birds watch we gave him for Christmas made him feel “like a man” (he’s six!), so hopefully this little blue tote bag also makes him feel like a little man.

peppermint popcorn

Peppermint Popcorn

Did you know that there is a National Popcorn Day? And did you know that it’s today, January 19? Popcorn is a snack worth celebrating, so I decided to make a batch of peppermint popcorn for an afternoon snack, inspired by this recipe from Our Best Bites.

Ingredients:

popcorn
white chocolate chips
semi-sweet milk chocolate chips
candy canes

Peppermint Popcorn

How I put it all together:

It’s best to use salt-free, butter-free popcorn for this sweet treat, so I popped the popcorn in the microwave in a brown paper bag. Just put the popcorn in the bag without any oil or anything, fold over the top of the bag, and microwave it until it stops popping. (Read more about making your own popcorn in the microwave.) For this recipe, I popped 1/8 cup of popcorn kernels, and I had twice as much as I needed.

popcorn

Line an 8×8″ baking pan with aluminum foil and spray lightly with oil. Put a bunch of white chocolate chips in the pan and place it in a warm oven. When the chips have melted, remove the baking pan from the oven and spread out the melted chips with a knife. Sprinkle with two thirds of the crushed candy canes, then add a layer of popcorn. Push the popcorn down into the melted white chocolate.

Meanwhile, melt the chocolate chips in a double boiler. (I use a metal bowl set into a small kettle.) Spoon the melted chocolate chips over the popcorn and sprinkle with the remaining candy cane pieces. Place it in the refrigerator to cool. Enjoy!

Peppermint Popcorn

our Elf on the Shelf wraps up another season

Our Elf on the Shelf, Zippy, is currently spending his last day on the shelf before he heads back to the North Pole ’til next December. This is what he’s been up to since the last update.

The kids made some gifts for Zippy, so I whipped up some custom letterhead so our elf could properly thank them for the hat and gloves he received.

Elf on the Shelf: thanks for the gifts

Good thing Zippy is always very careful not to knock things over. We found him in the china cabinet on Thursday.

Elf on the Shelf: china cabinet

On Friday, Zippy watched the characters in the nativity all day, but nobody moved a muscle.

Elf on the Shelf: nativity

Ethan’s bedroom isn’t quite finished yet, so Zippy checked out the construction zone over the weekend. He’s lucky he got out of there before the drywallers trapped him inside the wall.

Elf on the Shelf: construction zone

Arrr. Zippy the Bathtub Pirate!

Elf on the Shelf: bathtub pirate

Z is for Zippy! See you next year, little elf.

Elf on the Shelf: letter Z

a week of Elf on the Shelf antics

I can’t be sure what our Elf on the Shelf was up to while I was in the hospital for six days, but Zippy has been his usual mischievous self since I returned home with little Ethan last week.

Our elf must not be afraid of heights, because one morning we found him swinging on the Moravian star…

Elf on the Shelf: Moravian star

… and the next morning he was tangled up in a white pitcher above our kitchen cabinets.

Elf on the Shelf: white pitcher

On Thursday morning Zippy was on our mantel, convinced he was an angel. (We know better.)

Elf on the Shelf: wooden star

On Friday he spent the whole day with Ethan, our glow-in-the-dark baby (thanks to a bili light to improve his jaundice).

Elf on the Shelf: new baby

On Saturday morning we found him competing in an air hockey tournament. His opponent was a sweet girl from Idaho. I wanted Zippy to ask her whether she knew any famous foosball players from Idaho, but he was too shy.

Elf on the Shelf: air hockey

Fortunately, the officials didn’t notice that he was blocking his goal with his left hand.

Elf on the Shelf: air hockey

Zippy must have decided that the basement was a pretty great place to spend the weekend. On Sunday morning we found him playing Pac Man on Tim’s Atari. (Yes, we have an Atari; no, we do not have a Wii.)

Elf on the Shelf: Atari

Yesterday we found him in the bathroom again. This time he put a little photo of himself in a picture frame on the shelf. (This morning the kids checked to see whether it was still there, then wondered aloud where it went.)

Elf on the Shelf: Best Elf Ever

Last night Zippy did something he’s been wanting to do ever since he first arrived at our house last December. He strung up a zipline across our living room and is now dangling above our heads.

Elf on the Shelf: zipline

Elves have all the fun.

candy cane Hershey Kisses

Elf on the Shelf candy cane Hershey Kisses

Last week I discovered candy cane Hershey Kisses — and last night, Zippy did. Our Elf on the Shelf stuffed his little hands down into the candy jar to grab an armload of candy cane kisses, which may help us keep OUR fingers out of the candy jar today.

(Am I the last one to find out about candy cane Hershey Kisses? Why didn’t someone tell me about them sooner?!)

all in the details: a gray flannel pillowcase

gray flannel pillowcase with topstitching

As much as I love making things, I usually don’t want my creations to look like they’re obviously “homemade.” I’m realizing that often the difference between an item that looks homemade and something that’s handmade is all in the details.

Friday night found me sitting at my sewing machine, stitching up a cozy flannel pillowcase. I’ve fallen in love with the color gray, but I thought a gray pillowcase might look too boring without a little something special added to it. Fortunately my sewing machine has a nice reinforced straight stitch that basically makes two stitches right next to each other. So I just finished off my plain gray pillowcase with three rows of white topstitching, and it made all the difference in the world.

gray flannel pillowcase with topstitching

making himself at home

Our Elf on the Shelf returned to our house on Saturday morning, and after being gone for 11 months, Zippy seems to be feeling right at home again. On Saturday our family went to a local Christmas tree farm and picked out the perfect best tree. During the night, Zippy climbed up and sat near the top of the tree. I guess he was jealous of the other ornaments.

Elf on the Shelf sitting in the Christmas tree

Good thing we have more than one bathroom at our house. This morning Zippy had claimed one all for himself. Selfish little elf!

Elf on the Shelf bathroom sign - ELVES ONLY

By the way, if you have an Elf on the Shelf and haven’t yet added wire to his arms and legs, I highly recommend it. I followed this tutorial last year after the second day of trying to position our elf just right, and it’s the only way Zippy is able do fun things like hang from doorknobs and pretend to be a monkey.

our Elf on the Shelf returns

Elf on the Shelf returns

The kids came running into our bedroom at 7:12 this morning to tell us that Zippy is back! And he wrote a message with Scrabble tiles! I’m generally not a big fan of people waking me up to tell me about something I did last night, but they were so excited about the return of our Elf on the Shelf that I didn’t mind too much.

Do you have an Elf on the Shelf? If so, I’d love to hear about your elf’s return — or debut, if this is your first year with an elf. Last year our elf showed up late; turns out he made a wrong turn on the way from the North Pole.

To see more of Zippy’s antics from last year, check out all of my Elf on the Shelf pictures here. (My favorite was the night he baked peanut butter blossoms. Here’s hoping he does that again this year!)

s’mores bars

s'mores bar

Sometimes I’m really glad for leftovers — especially when the leftovers are sweet and gooey. I baked a pan of s’mores bars for an annual fall fest some friends of ours hosted this weekend, and I was secretly glad to be able to bring a few back home with us.

The recipe is from Bakergirl’s blog, and I discovered it via Pinterest a couple weeks ago. I didn’t follow the recipe exactly, since I couldn’t fit all 15 sheets of graham crackers on my pan, but these s’mores bars were super easy to make… and super delicious to eat! It’s hard to go wrong with graham crackers, butter, brown sugar, marshmallows, and two kinds of chocolate.

s'mores bar

P.S. You can find other yummy-looking foods I’ve pinned on my Pinterest board called “yum.”

BOO: a happy halloween card

BOO: a happy halloween card

I love most holidays, but I’m not a big fan of Halloween. Costumes and jack o’ lanterns are fun, but witches and skeletons and cobwebs just aren’t my thing. But last night I was craving a quick creative outlet, and came up with this happy little Halloween-themed card. I just cut out the word BOO from orange card stock, glued the letters and two wiggle eyes onto a black card, and taped a white insert to the inside for writing a little note.

BOO: a happy halloween card (inside)

BOO!

a 100-page book of vacation photos

vacation photos // Blurb book

Between my digital SLR, my iPhone, and my little point-and-shoot camera, I returned home from our family vacation to Chincoteague in July with 698 photos. I downloaded them to my laptop, backed them up to an external drive… and then ignored them for a couple months.

In September, I dedicated time to finally doing some things that I kept saying I would do “someday.” So I finally posted an album of vacation photos on Facebook, even though it had been a couple months since I vacuumed the sand out of the mini-van. And I finally removed the packaging from a gallery frame my mother-in-law gave us a couple years ago (!!!), printed seven of our vacation photos at CVS, and displayed them on the wall in our hallway.

Then, in late September, Elise Blaha wrote about a book of photos she got printed at Blurb — and she included a discount code for her readers to get $19.95 off a Blurb book within the next three days. I’ve been making an effort to get more of our photos out of my computer and into formats that my family can actually see and enjoy, and I couldn’t resist the generous discount on a Blurb book.

vacation photos // Blurb book

So I created a 100-page softcover book with 123 of my favorite vacation photos… and I love it. It’s so fun to be able to easily look through our vacation photos and remember all of the good times we had that week.

vacation photos // Blurb book

The book is seven inches square, and I chose to use only square photos that all bleed off the page.

vacation photos // Blurb book

On a few pages, I created a grid of four photos. When we started our vacation, I told Tim that I wanted to be sure to have some photos of myself. So I occasionally handed him the camera — and when I got a hole-in-one on the miniature golf course, I got a little excited… and totally forgot that Tim had the camera at that moment. But it was important for me to include some pictures of myself in the book, so the mini-golf pictures made the cut.

vacation photos // Blurb book

Thanks to the generous discount code, this nice thick book of vacation photos only cost about $16 — and half of that was for shipping. A hardcover book would be more durable, of course, but it also would have cost more.

vacation photos // Blurb book

I love my little 100-page book, and I won’t be surprised if I make a book of vacation photos every year. I can already imagine a whole series of books lined up on the shelf.

What do you do with photos from your vacations? Do you print some for framing? Make them into a book? Or just leave them on the computer like I usually do…?

two weekends in Virginia

Shenandoah Valley of Virginia

There are few places I would rather spend a gorgeous October weekend than in the Shenandoah Valley of Virginia, so I feel quite lucky that we spent the past TWO weekends there. I lived in Harrisonburg for 14 years before I got married and moved to Pennsylvania, and I suspect that returning to the Shenandoah Valley will always feel like returning home.

apple orchard

On Saturday we picked apples from the orchard and pumpkins from the vine… and on the way out of town on Sunday afternoon, I got a bowl of s’mores ice cream from Klines. It was the perfect way to wrap up a delightful fall weekend in one of my favorite places.

multicolor pumpkins

balloon birthday cards

balloon birthday card

Since August of last year, I’ve been one of the leaders of the Girls’ Club at our church, which means I plan monthly activities for a fun group of third, fourth, and fifth grade girls. This school year, I’m sending birthday cards to each of the girls when their big day rolls around. I already sent the first card a few weeks ago, and then I created a bunch more last week so that my cards are all ready to be personalized and written in throughout the year.

balloon birthday card - cardmaking supplies

I cut the balloon shapes from textured polka dot paper made by Bazzill Basics (on sale at Michaels).

balloon birthday card - paper balloon cutouts

I glued each balloon to a piece of white cardstock that I had already cut and scored for folding.

balloon birthday cards - in progress

Next I punched a tiny hole on each side of the “knot” part of the balloon and slipped a piece of bakers twine through the holes. (The twine is from The Twinery.) I still haven’t learned how to tie a bow that really looks right, but I fiddled with each of these until they looked good enough.

balloon birthday card - bakers twine

All stacked up and ready to be personalized!

balloon birthday cards stacked up

Madelyn’s birthday is next!

balloon birthday card - personalized

My bow-tying needs a little help, doesn’t it? Can you tie a perfect bow? If so, please tell me how it’s done!

40 Things I Love About You mini-book

When my husband hit the big four-oh a few weeks ago, I presented him with a little gift that combined two things I’m obsessed with: the man himself… and paper.

minibook - 40 Things I Love About You

I created a 40-page mini-book for Tim called “40 Things I Love About You.” I cut the pages from white cardstock (3×4″), rounded the corners, punched a couple grommets in the cover, and held it all together with two metal book rings. Then I got out a pen and filled the pages with things I love about Tim.

It was easy.

minibook - 40 Things I Love About You

in the box

As I ate some eggs and an english muffin for breakfast this morning, I commented to the kids about how much I’ve been enjoying the jar of plum butter from Aunt Phoebe that I recently opened. Hayden wanted to know whether she was younger or older than me, so I mentioned that she has a birthday coming up in a few weeks, and that we should be sure to send her something.

“Yeah,” he said. “In a BOX.”

Clearly, the box of goodies she sent for his birthday made an impression on him! He wanted to work on her gift right away, but I thought it was more important to get ready for school… So as I drove to work a bit later, I started thinking about what special treats we will put in the box.

If a box showed up on your doorstep with your name written on it, what would you hope to find inside? What items are on your wish list? I’d love to know.

open cardboard box

handmade vacation journals

One of the best things I did to get ready for our week of vacation this summer was make vacation journals. The night before we left, I decided that we should have a way to record our memories throughout the week, so I made journals for each of the kids — and then made one more for myself.

handmade vacation journal

I printed our destination and the year on a sheet of cardstock and stapled it together with six sheets of white paper. Then I folded it in half and called it done. It wasn’t fancy… but it was the night before we left.

The kids and I had a great time writing in our journals during the week — and they also enjoyed drawing pictures of some of our activities, like eating ice cream at Mister Whippy.

handmade vacation journal writing

We wrote about the places we went, the food we ate, and how we felt about being on vacation — from the first day…

handmade vacation journal first day

… to the last.

handmade vacation journal heading home

And while I was looking through our vacation photos to find these pictures, I decided to finally print out a bunch of photos from our trip to put in a big collage frame in the hallway. Great vacations are worth remembering often!

a better ironing board cover

We needed a new ironing board cover for longer than I’d like to admit. (I say “we” because my husband irons far more often than I do!) We didn’t like any of the options we found available for purchase, so I decided to make one. But I kept putting it off because I had never made one before and therefore I was afraid it wouldn’t turn out as well as I hoped.

Turns out it was a valid concern.

measuring for ironing board cover

sewing on white bias tape

On Saturday I decided to tackle the project I was dreading. It actually started off well, but I stopped taking pictures when the process became frustrating. The end result isn’t as perfect as I imagined, but it looks just fine — and it’s a million times better than the one that it replaced.

neutral ironing board cover

It’s probably the world’s most boring ironing board cover, but you know what? It works and it’s done. Finally.

new digs

new blog announcement // rachelswartley.com

I’m so delighted to announce that my blog has moved to a lovely new home at www.rachelswartley.com! I’ve been working on designing it and getting it set up for the past month, and it feels really good to be up and running! I feel like I’m still unpacking a bit, and there are still things that I want to tweak, but I’m really excited to finally go ahead and host friends and visitors in this new space.

Now for a little housekeeping…

If you’re following along via Google Reader, be sure to subscribe to the new blog feed so you can keep up with all future posts.

If you’ve been receiving email notifications about new posts, you should soon receive an email asking you to confirm your subscription to the new blog. Updates will arrive daily via Feedburner.

If you arrived via a link to my old blog (r8chel.wordpress.com), you should have been seamlessly redirected to my new blog. However, if you have my old site listed in your blogroll, I’d love it if you could take a moment to update the link.

Lastly, if you see something that looks totally out of whack, please let me know. Nobody wants to walk around with broccoli in their teeth or toilet paper stuck to their shoe.

Thanks so much for following along as I create a life I love. I’m so glad you’re here!